Monday, December 29, 2008

Antietam 146th Anniversary Commemoration, Part 4 - The I and XII Corps at Antietam

The quiet, pastoral setting of the Cornfield and East Woods at Antietam National Battlefield stands in stark contrast to the ferocity of the struggle waged by veterans of the Army of Northern Virginia against some of the most experienced and greenest troops in the Army of the Potomac. Here the Iron Brigade and the Pennsylvania Reserves faced the likes of Hood’s Texans and the Louisiana “Tigers.”

The Federal I Corps under Major General “Fighting” Joe Hooker and the XII Corps under Major General Joseph K. Mansfield, fresh from a desk in Washington, crossed the Antietam at the Upper Bridge and nearby fords and advanced to attack Jackson’s wing of Lee’s army.

After a short discussion of the advance of the I Corps from the area of the North Woods, Brian guided us through the East Woods and across the fields where the men of the XII Corps deployed. Brian has a real knack for finding challenging terrain to explore. Here, it mostly consisted of a few briars and tall grass soaked with the morning dew. We paused to consider Mansfield’s foolhardy and fatal attempt to stop his troops from firing into their own men, only to suffer a mortal wound after discovering the men in his front were indeed the enemy.

The XII Corps was a patchwork organization built upon the nucleus of Banks’s corps, men who had fought with varying degrees of success against Jackson’s men in the Valley. New regiments joined the corps prior to Antietam, often exceeding the existing strength of their parent brigades. To describe these new men as green understates the sad fact that many had yet to master even the rudiments of military drill. And yet several of these regiments fought tenaciously when not called upon to execute complex maneuvers.

As we tramped back through the East Woods toward the southeast corner of the Cornfield, Brian discussed the open nature of the managed woodlots framing this section of the battlefield. He also paused here to consider the experience of the 6th Georgia Infantry. This regiment sustained horrific losses resisting the advance of XII Corps through the woods and the increasing pressure of Federal infantry battling for control of the Cornfield.

The hike concluded with an overview of the fighting in the Cornfield. I will be covering the Cornfield in more detail next year once the weather warms and I am able to get in a few more hikes. We returned to our starting point in the North Woods with a greater appreciation of the efforts of the men of the Union I and XII Corps in one of the fiercest struggles of the war.

Sunday, December 28, 2008

The Christmas Stocking

Our family scaled back a bit for Christmas this year, but my stocking nevertheless contained two gems I look forward to reading in the new year. The first, Antietam, South Mountain, and Harpers Ferry: A Battlefield Guide, by Ethan S. Rafuse, will be handy as I plan to expand my study of the Antietam campaign and to cover the battlefield itself in more depth next year. I also received Cox: Personal Recollections of the Civil War-West Virginia, Kanawha Valley, Gauley Bridge, Cotton Mountain, South Mountain, Antietam, the Morgan Raid & the East Tennessee Campaign - Volume 1. I’ve had Jacob D. Cox's memoir on my Amazon wish list for some time now, so it is a welcome addition to my library. I often pass by the sites of Kanawha Valley campaign on my way to visit relatives in West Virginia. I hope to include some of these sites in my postings next year as well.

A belated Merry Christmas to all and best wishes for a happy and successful New Year. I am polishing up my final posts on the Antietam Anniversary hikes and will post them shortly.

Wednesday, December 10, 2008

Antietam 146th Anniversary Commemoration, Part 3

From Antietam 146th Anniversary Commemoration, Part 3 - The Middle Bridge


Many historians conveniently divide the battle of Antietam into morning, midday, and afternoon phases. This oversimplifies a complex battle and ignores the fighting around the Middle Bridge entirely. True, this was not one of the decisive contests of the battle, but understanding the action in this neglected area of the battlefield brings us one step closer to a more comprehensive picture of Antietam.

Ranger Brian Baracz led us over some of the most difficult terrain on the battlefield. West of the Middle Bridge, the typically rolling terrain condenses into a series of steep hills and deep ravines feeding into the valley of the Antietam, similar to the terrain faced by the IX Corps in their ill-fated advance later in the day. Brian has a knack for finding challenging terrain. He also finds quotes from reports, letters, and diaries that illustrate the salient points of the fighting and the experience of the men on the firing line.

We started off down the Boonsboro Pike, crossed at Rodman Avenue, and turned southeast along a recently restored stone wall bisecting the advanced position of Federal skirmishers who pressured rebel infantry and artillery cobbled together for the defense of Cemetery Hill (1). Continuing on, we crested the ridge and descended through a ravine to the banks of Antietam Creek, picking up a new trail along the creek to the Newcomer farm. The fields along the creek bottom here were filled with cavalrymen of the Army of the Potomac on September 17, 1862 (2). They waited in vain for an opportunity to sweep the rebel army from the field in a grand cavalry charge. Only a few batteries of horse artillery were engaged. This section of the trail will form a part of the Three Farms Trail, another step in the effort to create a series of linked trails covering the entire battlefield. Brian also informed us the park will soon acquire the Newcomer House, which was remodeled as a museum by its previous owner and will likely serve the same purpose in the future.

As skirmishers from the regiments of U.S. Regulars secured the area around he Newcomer Farm, Federal artillery crossed at the Middle Bridge and deployed on the heights beyond (3). Union guns positioned here dueled with rebel cannon posted on Cemetery Hill and beyond it to the south during the afternoon as the Regulars skirmished in the fields beyond, pushing Lee’s center to the breaking point. But General George Sykes, commanding the division of Regulars, chose discretion over valor and failed to push his advantage. Once again, as at other points on this bloody field, Lee’s army was saved by stubborn resistance and the unwillingness of Federal commanders to make one final push.

Despite Sykes’s caution, Federal skirmished managed to push nearly to the outskirts of Sharpsburg. A small triangular filed just west of the southern extension of Bloody Lane where it joins the Boonsboro Pike marks the position of the 4th U.S. Infantry. Skirmishers from this regiment pressed up the hill beyond before Sykes recalled them lat in the afternoon (4). The Hagerstown Pike is only a few hundred yards over the crest of the ridge beyond. Had McClellan pushed Sykes more aggressively and perhaps committed the Sixth Corps to the fray, Lee’s center must have collapsed under the strain. Perhaps not, but such are the perennial what-ifs of the battle of Antietam.

(Next Up: The I and XII Corps at Antietam with Ranger Brian Baracz)

Tuesday, December 2, 2008

Antietam 146th Anniversary Commemoration, Part 2

After a short break, I joined Ranger Mike Gamble to explore the route of the Irish Brigade in its legendary assault on the Bloody Lane. Mike’s guided walks are notable because he always provides maps with major points of interest noted for his particular subject. We started off along the trace of a lane between the Mumma and Roulette farms. The Mumma Farm is almost entirely a reconstruction, as the rebels burned the original structure, but the Roulette house maintains much of its original appearance. Mike pointed out the “witness hinges” on the cellar door of the house, and the Cultural Resources staff detailed some of the recent restoration efforts on several of the outbuildings.

Continuing along the Roulette Lane, we filed off into the ravine where the Irish Brigade formed up. Here the officers ordered packs down, and the men prepared to assault the Sunken Road. As the brigade left the shelter of the ravine, fire from rebel skirmishers on the crest of the ridge north of the lane began to tell. All of the regiments of the brigade, with the exception of the 29th Massachusetts, were armed with smoothbore muskets. Brigadier General Thomas Francis Meagher, leading his men from horseback, planned to deliver three volleys once he closed the distance to the road and then pitch in with the bayonet and trust to the impetuosity of Irish soldiers in close combat.

Soon Meagher was down – fallen from his horse. Neither Mike nor other historians I have questioned believe Meagher was drunk, as some have claimed. But the Irish fought on. The 29th Massachusetts, advancing on the right center of the brigade, approached on the reverse slope of the ridge north of the lane where the elevation shielded them from rebel musketry. This, and the superior range of their rifled muskets, combined to keep their casualties lower than the other regiments of the brigade. The 63rd, 69th, and 88th New York regiments were not so lucky. With most of the regimental commanders down and ammunition running low, the Irish brigade retired, and left the seizure of the Bloody Lane to Caldwell’s Brigade.

(Next Up: The Middle Bridge hike with Ranger Brian Baracz)

Sunday, November 30, 2008

Antietam 146th Anniversary Commemoration, Part 1

With the upcoming Illumination program on December 6, my thoughts return to the 146th Battle Anniversary Commemoration at Antietam National Battlefield. The anniversary program offered opportunities to explore lesser known areas of the battlefield and to develop new perspectives on famous aspects of the battle such as the fighting in the Cornfield or at Bloody Lane. The park’s historians guided a series of two hour hikes during the weekend of September 13-14, and the entire team conducted an all day hike of the battlefield (with a break for lunch) on the actual anniversary of the battle, September 17. I participated in a number of these hikes, and I am grateful to rangers Brian Baracz , Mike Gamble, and Keith Snyder for making this one of my most memorable and rewarding experiences since I first began touring battlefields so many years ago.

I arrived early on September 13 packing bottled water and my usual assortment of maps – Trailhead Graphics contour map with monument locations, a selection of views from the Carmen-Cope maps detailing troop movements, and the Bowlby map, which identifies crops planted in the area at the time of the battle. The weather was perfect – cool and clear with an early morning fog blanketing the valley along Antietam Creek, much as it would have been in September, 1862.

Keith Snyder led the first hike of the morning, focusing on artillery at Antietam with an emphasis on the morning action in the Cornfield – an appropriate introduction for the battle known as “Artillery Hell.” Keith reviewed the role of artillery in general and the specific tasks of members of the gun crews as an introduction. As we stood on the ground occupied by S.D. Lee’s battalion, Keith noted the field of fire of Lee’s guns, and their exposure to the big Federal twenty pounders lining the ridge across the Antietam. On our way to the Cornfield, we stopped at an unlikely place, or so I thought – the junction of the Mumma Farm Lane and Smoketown Road. No fewer than a dozen batteries of both sides occupied this area during the course of the battle. While this ground appears unimposing from a distance, it commands a clear view of the Cornfield area, much of the Bloody Lane, and parts of the West Woods.

Moving on to the Cornfield, Keith discussed the positions taken by several Federal batteries in and north of the Cornfield itself. From here, these batteries dueled with Lee’s guns and swept the corn with canister and shell as infantry of both sides struggled for an advantage. Standing where commanders fought their batteries in one of the most desperate battles of the war conveys the advantages of observation and clear fields of fire that even slight elevations provide on the battlefield. Antietam requires direct experience of the ground for a full understanding of the battle. Maps often represent the area bound by the East, West, and North woods as gently sloping farmland, but there are numerous examples of subtle changes in the terrain that offer significant military advantages (and disadvantages).

Keith’s last stop was the position of Campbell’s Battery near the Hagerstown Road, represented by a single gun surrounded by corn in summer and almost invisible. Here General Gibbon stopped to adjust the fire of his old Regular Army battery. And here Sergeant Herzog, with a mortal wound in his abdomen, dispatched himself with his pistol when told he could not survive more than a few hours. Keith has a particular talent for bringing the human dimension of the conflict to life with gripping stories like this, and also demonstrates a tremendous respect for the men who fought at Antietam and the sacrifices they made.

(Next Up: The Irish Brigade at Bloody Lane with Ranger Mike Gamble and the Middle Bridge with Ranger Brian Baracz)

Friday, November 21, 2008

Pamplin Park

The men of the Sixth Corps of the Army of the Potomac waited in the chill dampness of an early April morning for the signal to begin their all out assault against Lee’s lines southwest of Petersburg. For them, though they could not know it, this was to be the last great struggle against the vaunted Army of Northern Virginia. One week later, forced to abandon Petersburg and Richmond, Lee’s army, decimated by the breakthrough at Petersburg and the disaster of Saylor’s Creek, reached Appomattox Courthouse to find their path to safety and supplies blocked by Union cavalry, with infantry close behind.

Pamplin Park, a privately funded historic site located on the site of the Sixth Corps breakthrough near Forts Gregg and Whitworth, features an interpretive trail at the site of the assault, a fortifications exhibit, recreated camp structures staffed by costumed interpreters, field and farm exhibits at the restored Tudor Hall Plantation, and the acclaimed National Museum of the Civil War Soldier.

The soldier museum features exhibits on numerous aspects of a typical soldier’s experience, including camp life, training, equipment, and medical treatment. In one room, visitors face a life size video of a regimental firing line. The command to fire rings out and the room is filled with noise and the whir of bullets – simulated by jets of compressed air firing from the walls as smoke fills the screen in front and the command to reload echoes above the din. At the beginning of the tour, I chose a soldier to follow through the war as I progressed through the exhibits on the museum. The extracts from memoirs and letters specific to each soldier provide a unique experience for each visitor. During my visit, I learned how a certain private (I don’t wish to spoil it for anyone) escaped from a prisoner of war camp after his capture and decided he had had enough of war and returned home. I did not have time for the film in the museum, which purports to be a gritty, realistic portrayal of soldier life and the horrors of war.

Leaving the museum, I headed straight for the fortifications exhibit. Made of realistic synthetic materials to preserve the exhibit, the fortifications reconstructed here include a rampart, ditch, abatis, and chevaux de frise. The rampart terminates with an artillery platform complete with embrasure where uniformed reeanactors demonstrate artillery drill several times per day. Reconstructed cabins and other camp buildings lie just beyond the fortifications exhibit. Reenactors also staff the camp and will readily answer questions about life in the siege lines at Petersburg.

The park also houses the Breakthrough Museum, the gateway to the interpretive trails tracing the course of the Confederate works where troops of the Sixth Corps finally broke Lee’s lines on April 2, 1865, forcing the evacuation of Petersburg and Richmond. A short film describes the action, and the museum also displays Don Troiani’s Medal of Honor, which captures the moment when Captain Charles Gould of the 5th Vermont Infantry vaulted over the ramparts of the fortifications – claiming the distinction of first man into the rebel works. He suffered three wounds and was later awarded the Medal of Honor.

Gould’s regiment approached the rebel lines along the course of a ravine cloaked in early morning mist. The remainder of his brigade crossed open ground gently sloping down toward the Confederate position. The men gripped their rifles and strained for a glimpse of the opposing lines in the early morning mist, awaiting the inevitable storm of musketry and canister from the desperate rebel defenders. But Lee’s forces had been stretched beyond their limits. The Federals pierced the lines in several places almost simultaneously. Nearby, General A.P. Hill hastily departed from a meeting with Lee to determine the situation in his front. He would be dead within the hour, not far from the ground preserved today by the park (a marker erected on the spot where Hill was killed is still accessible). A podcast for the battlefield trail is available on civilwartraveler.com. As I was touring with a friend, I did not take advantage of this, but I’m hoping to take advantage of other podcasts for yours I am planning in the Spring.

While I did not spend any time touring Tudor Hall Plantation, also on the grounds of the park, I noted several items of interest. Costumed interpreters staff the home and farm buildings, and demonstrate the tasks of everyday life in the nineteenth century, including planting and tending crops.

Few sites offer the range of interpretation Pamplin Park provides. I thoroughly enjoyed my visit and will visit again the next time I travel to Petersburg. Plan to spend the better part of a day touring the park, especially if you want to take in the soldier’s museum and film.

Monday, October 20, 2008

The Bloody Lane: A Tour with Vince Armstrong, Part 2

After a break for lunch, we set off once again from the junction of the Mumma Farm Lane and Smoketown Road to begin the afternoon portion of the tour, covering the attacks of French and Richardson against the Sunken Road. Vince had several surprises in store here as well.

As he reveals in Unfurl Those Colors, Vince does not accept the standard story of French’s Division blundering blindly into combat at the Bloody Lane. Once again, the terrain provides an important clue. During his initial reconnaissance, Sumner would have seen not only Green’s Division in the swale northeast of the Dunker Church, but also the rebel position in the Sunken Road in the area of French’s attack. In a post-war letter, Sumner’s son, who served as an aide during the battle, explained that he delivered an order to French to press his attack shortly after the advance into the West Woods.

It is important to note French was ordered to “press,” and not to begin, his attack. Also, he describes riding past the position of the Rhode Island Battery on hi way to French. This is a clear reference to Tompkins battery, represented today by the four Parrot Rifles just east of the Visitors Center. Vince argues that the language of the younger Sumner’s recollections suggests not only that French had positive orders to attack where he did so, but also that Sumner was aware of his location from the beginning. There is no similar evidence for Richardson’s Division, though his troops were deliberately held back from Sumner for reasons known only to McClellan.

Vince continued on to the Roulette Farm, then northeast along the Roulette Farm Lane to the ravine where the Irish Brigade deployed prior to their advance toward Bloody Lane. The lane itself is hidden from view along the path of their advance until the last 50-100 yards, and some primary source evidence suggests the Confederates may have defended the position from the military crest of the ridge north of the lane for the larger part of the engagement, only becoming trapped in the lane during the final moments of the struggle for Lee’s center.

We moved south toward the lane along the path of the 29th Massachusetts Infantry, the only non-Irish regiment in the Irish Brigade, and also the only unit in the brigade armed with rifles. Their advance also aligned directly with the portion of the Sunken Road obscured by higher ground to the north. These factors combined such that the 29th suffered the lowest loss of the brigade that day. Then too, the 29th did not receive the order to charge in conjunction with the three Irish regiments of the brigade. Vince believes Brigadier General Thomas Meagher, commanding the brigade that day, intentionally left the 29th in position. Meagher states that he decided to trust the impetuosity and élan of the “Irish” in the charge. Perhaps, as Vince suggests, we should take him at his word, and not assume the order to the 29th Massachusetts miscarried.

Though the attack of the Irish Brigade did not gain the position on its own, the situation for the Confederates deteriorated rapidly as Caldwell’s Brigade moved up on the left and flanked their position in the lane. One final item of note concerns the conventional wisdom that the rebel formations defending this area disintegrated and that Lee’s army was finished if only McClellan had followed up this success in the center. But this ignores the presence of Anderson’s Division. Though engaged heavily in the fighting for the Bloody Lane, Anderson’s troops still packed enough of a punch to repulse the advance of the 7th Maine Regiment later that afternoon with heavy loss. The absence of battle reports from Anderson’s Division in the Official Records is lamentable in this case, but Vince is now working on the story of this fight from the Confederate perspective. I look forward to the results of his latest research. If Unfurl Those Colors is any indication, his conclusions will demand we approach the engagement with a fresh perspective, and may shatter long held misconceptions.

Thursday, October 16, 2008

The West Woods: A Tour with Vince Armstrong

From West Woods

Marion “Vince” Armstrong’s recent work, Unfurl Those Colors, presents an unconventional and perhaps controversial analysis of the role of Major General Edwin V. Sumner and the Second Corps of the Army of the Potomac in the battle of Antietam. On October 11, Vince guided a tour of the West Woods and Bloody Lane for members of the Save Historic Antietam Foundation, relating his conclusions with particular attention to the impact of the terrain on the events of September 17, 1862.

The tour began at and then proceeded to Cornfield Avenue at the historical western boundary of the East Woods. As a prelude, Vince discussed Sumner’s initial reconnaissance of the battlefield, which is critical to understanding the deployment of his corps. Among the gentle slopes marking the northern part of the battlefield are several commanding elevations not apparent at first glance. One of these, at the junction of the Mumma Farm Lane and the Smoketown Road, offered Sumner a clear view of the western leg of Bloody Lane, the swale northeast of the Dunker Church where Greene’s Division was deployed at the time, and the advance of the 125th Pennsylvania into the southern terminus of the West Woods.

As Sumner moved to the north along the edge of the East Woods, he noted the noise and smoke from firing in the northern edge of the West Woods, and decided to advance Sedgwick’s Division to the West Woods to secure it prior to a general advance toward the town of Sharpsburg from the north and west, as ordered by McClellan. We followed Vince along the general route of advance of Sedgwick’s troops to the position of the 1st Minnesota at the northwestern edge of the West Woods, then moved southeast through the woods to the 15th Massachusetts monument. Vince argues that the casualties sustained by these regiments and the number of rounds expended suggest a harder fight in the West Woods than many historians suggest.

Continuing southeast through the woods, Vince paused in a ravine running roughly north-south and illustrated how this feature became a channel for Barksdale’s attack against Sedgwick’s flank. He also pointed out the critical flaw in Sedgwick’s line. As the division advanced in three brigade lines, the first brigade under Gorman obliqued to the right, but the leftmost regiment, the 34th New York, failed to hear the order and continued directly west toward the southern edge of the woods just beyond the Dunker Church. In the second line under Dana, the 7th Michigan also drifted away from its brigade. Barksdale’s men, taking the path of least resistance through the ravine mentioned above, poured into the gap opened by the mistaken deployment of these two regiments with devastating consequences. Vince argued that Sedgwick’s undoing was not necessarily the unwieldy formation of his division into three lines, but the gap opened on his left by the misalignment of these two regiments.

Throughout the tour, Vince emphasized the importance of a firsthand appreciation of terrain in reaching his conclusions about Sumner and the attack of Sedgwick’s Division. The gently rolling terrain on the northern part of the battlefield is deceptive. Moving as little as 100 yards alternately reveals or obscures large expanses of the field, and elevations that appear slight from a distance may dominate the surrounding terrain in unexpected ways. Vince’s awareness of the terrain shines through in Unfurl Those Colors, and lends weight to his sometimes controversial conclusions.

Monday, October 6, 2008

Malvern Hill

From Malvern Hill

The battle field of Malvern Hill is a quiet, secluded place today, almost incongruous with the devastation wrought by concentrated Federal artillery upon hapless attempts by Lee’s infantry to dislodge Mclellan’s army from its final defensive position of the Seven Days battles. Malvern Hill is not very much a hill at all, but a slight rise hemmed in by woods and swampy creek bottoms feeding into the James River.

On this gently sloping plain, under a burning sun on July 1, 1862, sixteen guns commanded by Henry J. Hunt punished rebel infantry attacks and delivered a lesson on the awesome defensive power of Civil War artillery supported by solid ranks of infantry in the open. It was a lesson Lee would have done well to remember little more than one year later as he gazed across another expanse of open ground commanded by Federal artillery just south of the town of Gettysburg.

I followed the trail from the rebel lines toward the Federal right, and then along the Union line to the small exhibit shelter. The tiny silhouettes of several cannon marking the area of an abortive attempt by Lee’s gunners to concentrate their own artillery are visible in the distance from the line of cannon marking the Union position. There is no cover, nowhere to pause in relative safety to dress ranks, just as there was almost no chance the series of uncoordinated attacks launched across this ground would pierce the Federal defenses.

Visible along the trail just beyond the main Federal position are the vast open fields where Federal reserves watched and waited as the battle unfolded. These reserves might have been deployed for a decisive counterattack, but that remains one of the intriguing what-ifs of the Seven Days campaign.

The battlefield at Malvern Hill is easily understood from the exhibit shelter for those with no time to hike the battlefield trail. Indeed, most of the field is visible from here. A visit to the two main sites of the Seven Days Battles, Gaines Mill and Malvern Hill, makers for an easy afternoon excursion if your travels take you to the Richmond area.

Thursday, September 4, 2008

Gaines Mill

From Gaines Mill

Robert E. Lee assumed command of Johnston’s Army of Virginia in the confusion following Johnston’s wounding in the fighting at Seven Pines. Within days, Lee’s re-christened Army of Northern Virginia delivered a series of sledgehammer assaults against the right wing of McLellan’s Army of the Potomac. General Fitz John Porter commanded this wing of McLellan's army. He posted his troops in a strong position behind Boatswain’s Swamp along the northern bank of the Chickahominy River in the area of Gaines Mill. The battle of Gaines Mill in June 1862 was the second largest engagement, in terms of losses, fought between the armies of the Union and Confederacy up to that time.

When I last visited the Gaines Mill battlefield, the park unit consisted of a small plot of ground in the area of the Watt house, near the center of the Union position where Hood’s Texans broke through after a long day of fruitless assaults all along the line. Today, the battlefield is much larger, and includes a walking trail along the wooded ravine formed by Boatswain’s Swamp that offers views of the ridge defended by Porter’s Fifth Corp of the Army of the Potomac.

The steepness of the ridgeline above Boatswain’s Swamp allowed supporting lines of Federal soldiers to fire over the heads of their first line. Lee’s assault troops struggled from the outset, traversing thickly wooded slopes on both sides of a swampy morass running along the bottom of the ravine. Their formations broken by terrain and a withering fire, most of these assaults broke against the formidable Union position. Near the area where Hood’s Texans finally broke the Federal line, a draw descends to the bottom of the ravine, a ready avenue of attack offering a relatively sheltered approach.

As the trail winds its way southward along the ravine, it emerges near the Union left, where the final tragic scene of the battle of Gaines Mill played out. Here the 6th Pennsylvania Cavalry (Rush’s Lancers) formed for a last ditch charge to stall the Confederate advance. Their charge failed with predictable results and in the end, this only added to the confusion in the wake of Hood’s breakthrough.

My most recent visit to Gaines Mill offers a poignant lesson on battlefield preservation. True, the park service has preserved and interpreted much more of the site than when I last visited many years ago. But a fence stands at the bend in the trail where visitors view the area of the 6th Pennsylvania’s charge and a final desperate stand by Federal batteries overwhelmed in the chaos of defeat. These areas of the battlefield remain in private hands. I hope one day to return and find the trail extended to these areas of the battlefield. To that end, I am proud to be a member of the Civil War Preservation Trust. To find out more about CWPT and their efforts to preserve Civil War sites across the country, visit their web site at .

Thursday, August 28, 2008

The USS Monitor Center


The duel between the USS Monitor and CSS Virginia is perhaps the most famous ship action in American history. To many, the fight sounded the death knell of wooden ships and ushered in the era of modern naval warfare. Whether you agree or not, a visit to the USS Monitor Center in Newport News, Virginia is a must for anyone with an interest in the battle of Hampton Roads and the strange new ironclads that fought to a stalemate there in 1862.

The USS Monitor Center is part of the Mariner’s Museum. While I visited mainly to see the center, the larger museum contains hundreds of interesting exhibits and model ships, including a notable gallery on the age of Nelson. Whether you intend to see the entire museum or not, consider a visit. The Monitor Center alone is worth the price of admission.

A full scale replica of the Monitor’s turret stands just beyond the Nelson gallery in the main museum. Near the turret is a Dahlgren replica mounted on a naval carriage. This is an impressive cannon, and I wonder how the battle might have been different had the Monitor’s crew used full instead of half charges for their guns.

Within the center itself are reconstructed officer’s cabins, videos of uniformed reenactors portraying various crew members, and a room containing the red distress lantern the Monitor’s crew hung above the turret shortly before she passed beneath the waves. One room contains a scene of the CSS Virginia in dry-dock. A replica of the bow of this massive vessel stands across the room, and as I moved through the exhibit, I entered by the port side and saw a reconstruction of the inside of the ship and peered through one of the gun ports on the bow.

The Battle Theater presents the story of the battle of Hampton Roads using stunning CGI graphics and surround sound in a three-sided theater – this is truly something to see and was one of the highlights of the visit. Another film details the efforts to raise the turret and preserve various artifacts from the ship, and the center includes a full-scale model of the turret as it was found on the bottom of the ocean, the guns upside-down and everything encrusted with sand and mud and debris. Beside this display is a cutaway model of the turret including one of the massive Dahlgrens mounted on it carriage.

Imagine walking on the deck of the Monitor as she was in 1862 and standing beside the massive gun turret. At the Monitor Center, you can (almost). Just outside the museum stands a full scale replica of the Monitor. I was truly impressed by the size of the ship. Plates on the deck detail various aspects of the ship and its crew.

Back inside the museum, the last gallery of the center focuses on the engines and the area beneath the massive turret. The cutaway replica of the turret stands immediately above. As conservation continues, this area may eventually contain the Monitor’s engines. On the way out, visitors can see the huge tanks containing the Monitor’s turret, engines and guns. Reversing the decay of ages will take several years at the least. Still, as I gazed down at the Dahlgren guns in their murky chemical bath, I was moved by the realization that I stood before one of the guns whose blasts marked the end of the age of sail and ushered in the age of iron.

I planned to spend two hours at the Mariner’s Museum and the USS Monitor Center. I spent five hours there, and it was well worth it. If your next Civil War tour takes you anywhere near Newport News, Virginia, plan to spend some time here.

Sunday, August 24, 2008

Book Review Roundup

As mini-reviews of books and Civil War web sites accumulate, I will consolidate them into permanent posts. The first three mini-book reviews follow.

Unfurl Those Colors (Marion V. Armstrong)

While I won't be doing formal book reviews, I will include opinions on recent reading. For thorough reviews, check out CWBN and CWBA, both listed in my favorite blogs list.

Unfurl Those Colors details the role of the Second Corps of the Army of the Potomac in the Antietam Campaign. Armstrong argues that Sumner's performance was not quite as bad as Sears and other historians contend.

Armstrong also argues that Sumner's decision to commit Sedgwick in the West Woods was reasonable given battlefield conditions, and that French's division did not drift toward the Bloody Lane, but was directed to attack to support the Federal right. His argument weakens a bit in his defense of Sumner's conduct after the destruction of Sedgwick's division.

Overall, Armstong delivers a detailed and entertaining analysis of the Second Corps' attacks upon the West Woods and Bloody Lane. Well worth reading, and sure to spark debate on these controversial actions.


The Ninth Corps at Antietam (John Schildt)

While this book provides interesting detail about the Ninth Corps in the Maryland campaign, I find it difficult to recommend due to a disjointed presentation, missing foot notes, and a lack of editing.

The main strength of the book is its diverse coverage of the Ninth Corps. Schildt includes brief histories of most of the regiments of the corps, material on hospitals after the battle, a narrative of Lincoln’s review of the corps during his visit to the battlefield, and extracts from regimental monument dedications.

If you are particularly interested in Ninth Corps minutiae, consider this book.

Roll Call to Destiny (Brent Nosworthy)

Brent Nosworthy’s new book compiles detailed accounts of several Civil War actions originally intended for his previous. Each examines a representative tactical situation, such as infantry in rough terrain, infantry assaulting fortifications, cavalry vs. cavalry, and artillery in attack and defense.

Aside from its generally entertaining vignettes, the book stands out for detailed tactical observations not always found in other works. What the book lacks in unity and synthesis is corrected when taken together with Nosworthy’s previous book. And as the accounts of each action stand alone, this is a great read for time-challenged Civil War enthusiasts.

Highly recommended, along with Bloody Crucible of Courage (get this book if you don’t have it).

Tuesday, August 19, 2008

Averasboro Battlefield


I finished my tour of Bentonville with several hours of daylight remaining and struck out for Averasboro. The latter is about one hour’s drive over rural roads from Bentonville, and is well worth a visit. Though I did not arrive in time to see the visitors center, I saw enough of the field to make the detour worthwhile, and will definitely visit again in the future when opportunity offers.

The battle of Aversaboro was fought prior to the climax of the campaign at Bentonville. Hardee’s delaying action on March 16, 1865, assisted by a steadily worsening rain falling throughout the day, separated Sherman’s wings under Slocum and Howard, giving Johnston a chance to defeat them in detail.

As the visitors center was closed, I missed the map room display and also a diorama of the Federal assault on Hardee’s first defensive line, manned by the troops of Rhett’s brigade. The generally flat, open terrain of the battlefield seems at first glance to offer few opportunities for defense. To compensate for this, Hardee deployed in three lines. To the rear of Rhett’s troops in the first line, Hardee posted Elliot’s Brigade of Taliaferro’s Division behind field works. McLaws Division anchored the third and final defensive line, straddling the Raleigh Plank Road (modern Rt. 82) near the present location of Chicora Cemetery.

With sunset fast approaching as I pulled in to the visitors center parking lot, I toured the battlefield in reverse chronological order. The visitors center appears to be located near the site of a ravine defining the northwestern flank of the last rebel defensive line, an area marked by heavy fighting between Vandever’s Federal brigade and Wheeler’s cavalry. Chicora Cemetery, roughly the center of Hardee’s third line, is a short distance to the south along Route 82. The cemetery contains several Confederate graves and also a reconstructed slave cabin from one of the local plantations present at the time of the battle.

Continuing further south along Route 82, I passed the second confederate defensive line, then pulled off to the right on a small side road marking the position of the first rebel line, manned by the Rhett’s troops. Here, Case’s Federal brigade moved north along a tree-lined ravine to the west of Rhett’s position and stormed out of the woods, rolled up the rebel flank and overran two artillery pieces. A small hillock to the south marks the position of the Federal artillery, and is the only elevation of note in the battlefield.

One of the notable aspects of Averasboro, and of the Bentonville battlefield as well, is the detail of the roadside historical markers. Unlike many historical markers that provide and incomplete picture at best, these provide interesting and relevant detail. Both of these battlefields are success stories of preservation efforts by state and private organizations. And both are well worth a visit.

(Photos to accompany the Bentonville and Averasboro posts coming soon.)

Note: Map from the David Rumsey Collection, courtesy of Cartography Associates (see www.davidrumsey.com for numerous maps of Sherman’s campaigns).

Sunday, August 10, 2008

Bentonville Battlefield


The battle of Bentonville, perhaps the Confederacy’s last hope to stave off final defeat, witnessed the last charge of the Army of Tennessee and was the climactic contest of Sherman’s campaign to subdue the Carolinas. The battlefield is marked by alternating areas of open fields, stands of tall oaks or scrub pine, and swampland. The only elevation changes of note are two depressions. The first of these, formed by a Y-shaped ravine on the western part of the field, figured prominently in the early stages of the fight. The second, formed by the course of Sam Howell Branch, marked part of Johnston’s defensive line on the second and third day of battle.

The action at Averasboro on March 16, 1865, separated the wings of Sherman’s army under Slocum and Howard as Johnston gathered a scratch force combining elements of the Army of Tennessee with forces of the department of North Carolina under Bragg, and of South Carolina, Georgia, and Florida under Hardee. The Federal Fourteenth Corps, under Jefferson C. Davis, led Slocum’s advance toward Bentonville along the Goldsboro Road (SR1008).

Bentonville Battlefield is a North Carolina State Historic Site featuring a four stop driving tour. The visitor’s center offers a fiber optic map detailing the events of the first day’s battle, a short introductory film, and a small book store. Contact them for Moore’s Historical Guide to the Battle of Bentonville and Bradley’s Last Stand in the Carolinas. Both of these excellent works are generally unavailable elsewhere. The maps on the battlefield’s web site (http://www.nchistoricsites.org/bentonvi/) are drawn from Moore’s work, one of the finest battlefield guides I have seen. It includes detailed maps for every phase of the action and references to help you orient your view from the various roadside markers on the battlefield, as well as maps for the preceding engagements at Averasboro and Monroe’s Crossroads.

The driving tour at Bentonville contains four stops. Three focus on the action of March 19, while the fourth is near the site of Union General Joseph Mower’s breakthrough on March 21, near the site of Johnston’s headquarters. Numerous historical markers also line the roads that traverse the battlefield. Moore keys all of the maps in his guide (and on the battlefield web site) to the location of these markers, so it is possible to orient the maps from each of them to enhance your understanding of the action. I focused on the main tour stops on this visit.

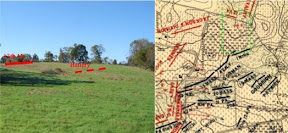
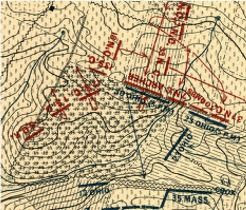
The first stop, “Confederate High Tide,” is just to the north of the Federal line on March 19, where Stewart’s Army of Tennessee drove hard against the Federal center (photo 1). The broad expanse of open farmland framed by woods to the east and west here offered an excellent field of fire for a concentration of Union guns to the south. These cannon shored up the Federal line and unleashed a storm of fire on the charging rebels, buying time for brigades of the Fourteenth and Twentieth Corps to form an effective defense.

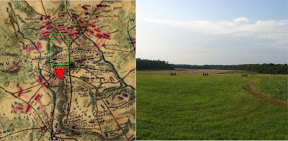
While the Army of Tennessee attacked in the center, Hoke’s Division of Bragg’s Department of North Carolina command attacked the Union right defended by Morgan’s Division of the Fourteenth Corps. Stop 2, “Morgan’s Stand,” offers views of the swampy woodland defended by Morgan’s troops (photo 2). Several brigades veered eastward from the Confederate center, increasing the pressure on Morgan and bending his left back perpendicular to his main line. Just as his men repulsed Hoke’s attacks from the west, the rebels appeared in his rear. Morgan’s men, with the pluck of seasoned veterans, simply hopped over their works, fought them in reverse, and repulsed these attacks as well.

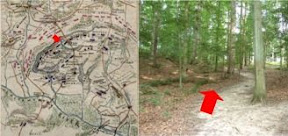
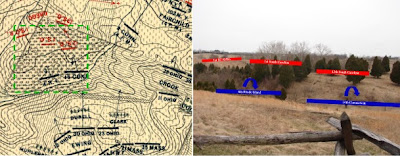
Stop 3 of the tour straddles the position of the 100 young soldiers of the North Carolina Junior Reserves, the largest brigade in Johnston’s army. The Reserves were only lightly engaged during the fighting at Bentonville, but their position marks the pivot point between the two Confederate wings in their attacks on March 19. Later, when Howard’s wing of Sherman’s army approached from the east, the Reserves pulled back to the north, forming the southern apex of Johnston’s horseshoe shaped defensive line on March 20-21. The view to the east from this position (photo 3) takes in Cole’s Plantation, where Stewart’s Army of Tennessee attacked and routed Carlin’s Division of the Fourteenth Corps in the opening phases of the battle. The ravine marking Carlin’s position conforms roughly to the tree line visible in the distance to the right.

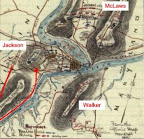
As the fighting drew to a close on March 19, the hard pressed soldiers of the Federal Fourteenth and Twentieth Corps worked to improve their positions for the expected renewal of the rebel assaults the following day. Johnston, however, taking stock of his losses and the approach of Howard’s wing of Sherman’s army, decided to pull the Army of Tennessee back to his start line. He also ordered Hoke’s Division to disengage and take up a new position fronting eastward across the wooded ravine marking the course of Sam Howell Branch and then bending back to the northwest along the Bentonville Road. McLaws Division deployed to the left of Hoke, and Wade Hampton’s cavalry troopers covered the extreme flank to the north.

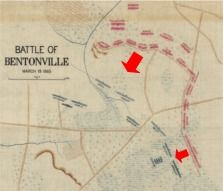
March 20 saw no action as Howard’s men moved onto the field and linked up with Slocum’s battered wing. March 21 dawned overcast and rainy, and the armies faced one another over the ramparts of hasty fortifications. Toward late afternoon, Union General Joseph Mower advanced his division without orders and punched a hole in Johnston’s left. Mower’s men surged across large areas of swampy ground and quickly overwhelmed the rebel defenders, nearly overrunning Johnston’s headquarters (photo 4). Johnston and his staff, surprised at this turn of events, fled the area on foot as Generals Hardee and Hampton scraped together available infantry and cavalry for a counterattack. With no support at hand, Mower’s troops grudgingly gave ground and retreated back to their original positions. Howard pressed Sherman for authorization for a general attack, but Sherman demurred.

Johnston’s army withdrew from the field on the night of March 21. This last desperate attempt to stop Sherman’s advance cost his armies 1,527 casualties. Sherman’s forces suffered 2,606 casualties. In less than two weeks, Grant’s armies broke through at Petersburg and began the final pursuit of Lee’s Army of Northern Virginia. Johnston withdrew westward toward Durham, North Carolina. He surrendered his army and all Confederate forces east of the Mississippi on April 26, 1865 at Bennett Place, near Durham.

Thursday, July 31, 2008

Civil War Weekend 2008

Three weeks since my last post – please accept my apologies for such a long delay. I was busy preparing for Historicon, the largest historical miniatures wargaming convention in the USA. My other hobby is miniature wargaming and I also import several ranges of historical miniatures from the UK. Interestingly enough, I built a diorama of the action in the Forty Acre Cornfield at Antietam to display in my booth at the show. But enough on that – I may return to it later as a sidebar.

Tomorrow I leave for my annual Civil War weekend with my friend Matt, who has been touring battlefields with me since the early days. We are heading South, of course. The first stop is Bentonville, NC. I have purchased a copy of Mark Moore’s excellent guide and printed out full color maps for each tour stop from the battlefield web site. Time permitting (and the schedule is tight) we may get to Averasboro as well.

From North Carolina, we will head northeast to Newport News, Virginia. The Mariner’s Museum there houses the USS Monitor Center. Besides a full scale replica of the Monitor, the center contains many artifacts from the wreck of this most famous of ironclads, including a significant portion of the turret. Side excursions will include Gaines Mill, Glendale, and Malvern Hill as time allows.

On Sunday, we head west to Pamplin Park, located on the site of the April 2, 1865 breakthrough that shattered Lee’s Petersburg defenses and precipitated his retreat to Appomattox. Pamplin Park contains the National Museum of the Civil War Soldier, where visitors follow the experiences of a single soldier through the war and a series of interactive exhibits. The park also features a section of reconstructed works, including trenches and abatis, as well as several trails interpreting the site of the breakthrough.

On the way home, I hope to stop off at the North Anna Battlefield Park. This may be overly ambitious, but I am hopeful nonetheless. I expect this weekend to provide material for many posts in the weeks to come.

Monday, July 7, 2008

The Siege of Harpers Ferry


Harper’s Ferry offers a unique combination of scenic beauty, history, and entertainment. It’s a great place for a day trip. In fact, I drove to Harper’s Ferry twice over July 4th weekend. To be honest, the first trip was a washout – it poured from the minute I crossed into West Virginia. Since we live less than an hour away, I decided to try again the next day.

Confederate troops opened their siege of Harper’s Ferry in September 1862 with a three pronged effort to capture the commanding elevations surrounding the town. McLaws seized Maryland Heights to the north, driving the Federal garrison pell-mell down the slope and across the bridges to the town. Walker’s Division occupied Loudon Heights to the south. Jackson’s troops invested the Federal position on Bolivar Heights from Schoolhouse Ridge to the west.

I first hiked along the Federal skirmish line between Bolivar Heights and North Schoolhouse Ridge, where three green New York regiments spent an uneasy night on the line awaiting a frontal attack that never came. Jackson had something else in mind. He sent a column under A. P. Hill to outflank Bolivar Heights from the south. Hill placed several batteries to enfilade Bolivar Heights, and after a sharp morning bombardment, his infantry started their advance. White flags appeared in the Federal lines as the infantry closed in.

On Bolivar Heights, Union Colonel Dixon S. Miles, commanding Harpers Ferry, determined further resistance was useless. Shortly thereafter, he was mortally wounded by one of the last salvos from the rebel artillery. The Federals never should have attempted to defend Harpers Ferry in the first place. Once the rebels seized Maryland and Loudon Heights, the contest was simply a matter of time. Looking from Bolivar Heights to the dominating summits of the other elevations to the east, the indefensibility of the post is clear. What McLellan may have done with the 12,000 troops surrendered here is a matter of speculation. He certainly made no strenuous effort to save them from the trap.

The trails along Bolivar Heights offer excellent views of Shoolhouse Ridge, Maryland Heights, and Loudon Heights. Take a map, and start at the Bolivar Heights area on Washington Street just off Route 340. I started my hike without a map from the Federal skirmish line area at the western end of Bolivar Heights, and ended up walking the trails between the two areas. The drive between is much easier, and you won’t miss anything. I plan to take in the southern end of Schoolhouse Ridge and Maryland Heights on my next visit.

Monday, June 30, 2008

Antietam: The Final Attack Trail Part 2


The men of Ewing’s Brigade of the Kanawha Division steadied themselves behind the fence rails along the Otto farm lane as men of the 16th Connecticut and 4th Rhode Island streamed past. The Ninth Corps’ flank, and the success of their drive toward Sharpsburg, threatened to unravel under the relentless pressure of A.P. Hill’s slashing attacks. As Gregg’s South Carolinians drove eastward through the 40 Acre Cornfield, Archer’s Brigade formed along the Harper’s Ferry Road and prepared to join the fray.

The 23rd and 30th Ohio regiments of Ewing’s brigade scaled the fence in their front and steeled themselves to repel the rebels closing in from the south and west. The 23rd Ohio drove westward just to the north of the corn, while the 30th Ohio moved to the bottom of the ravine, entered the corn, and drove up the opposite slope. Once more, however, confusion reigned in the Federal ranks, and the 12th Ohio failed to advance with the rest of the brigade. Both the 23rd and 30th Ohio halted at the stone wall bordering the western end of the cornfield and poured a telling fire into the flank of the 7th and 37th North Carolina regiments of Branch’s Brigade, the second of A.P. Hill’s units to reach the field. The North Carolina regiments recoiled under this fire, but support was not far behind.

Archer’s tiny brigade of Hill’s division, reduced to less than 400 men by the grueling march from Harper’s Ferry, drove west from the Harpers Ferry road and charged the stone wall manned by Ewing’s Ohio regiments. At first, the Ohio boys held their own. Gregg’s men, however, still held the southern and western portions of the cornfield, and increased the pressure on the Ohioan’s flank until the position at the wall became untenable. Ewing refused his left flank, facing the 23rd and several companies of the 30th Ohio to the southwest. Other companies of the 30th Ohio retired east toward the Otto Farm Lane, where they mingled with remnants of the 16th Connecticut of Harland’s brigade.

Ewing’s last regiment, the 12th Ohio, nearly broke under a prolonged fire of infantry and artillery, some of it from friendly batteries. At length, the regiment took position along the western fence line of the Otto Farm Lane, unwilling to advance into the teeth of Gregg’s veterans, convinced that the same unhappy fate that befell Harland’s regiments awaited them in the broad expanse of corn to their front.

As dusk settled over the smoke filled ravines of the Otto Farm, Gregg’s men consolidated their position. Sturgis’s division of the Ninth Corps, having replenished its ammunition after its fight for the Rohrbach Bridge, relieved Ewing’s hard pressed brigade and took position along the Otto Farm Lane, facing west. These Federals engaged Archer’s and Gregg’s men with a desultory fire until dusk put an end to the contest.

A. P. Hill’s driving counterattack had unraveled the Ninth Corps offensive. Hill’s veterans exploited the rugged, confused terrain south of Sharpsburg and fought with determination and vigor. Behind the scenes, Lee himself drove every serviceable gun he could find into action along the ridge crowned by the Harpers Ferry Road, while McClellan, fretting precious hours away at the Pry House east of Antietam Creek, sent only a single battery to support the Ninth Corps in its hour of need.

Darkness brought an end to the fighting. Though Burnside expressed his willingness to continue the fight on the morrow if properly supported, McClellan would let September 18th pass without action. Lee’s army withdrew across the Potomac the following day, and but for a short, sharp action at the ford below Shepherdstown, the Maryland campaign was over.

Wednesday, June 25, 2008

The New Gettysburg Visitors Center

I visited the new Gettysburg Visitor’s Center this past week with a few family friends. Like many of you, I suspect, I am often called on to give tours at Antietam or Gettysburg for relatives and friends. This was my third visit to the new facility. We spent just over two hours there and skipped most of the Gettysburg Address exhibits to save time for walking the field.

The museum offers a much broader perspective of the war and the exhibits are more topical than the previous museum’s long ranks of muskets and rifles. I do miss the old weapons displays, but they survive in a limited form, and there are numbers of them scattered about in thematic displays. Overall, the presentation has improved dramatically.

Short films provide introductions to each day’s fighting, summaries of the war prior to and after Gettysburg, and an overview of slavery and its impact on American society. The latter film may not sit well with the states rights crowd. The battle films use animated maps to detail the action. Presentation is geared toward general interest in every case. Controversies and regimental detail are lacking, but I tend to agree with the targeting of exhibits toward a general audience. After all, before I was a buff, I was a kid with a copy of They Met at Gettysburg, and it was all new to me.

The exhibits are generally good, but several stand out for me. Interactive touch-screen displays allow you to select any regiment and find its location on the field, along with a picture of its monument. Plaques display the formations and tactics of each service branch using drawings reminiscent of the old American Heritage battle diagrams (or the more recent Battle in the Civil War by Paddy Griffith). Finally, the Pickett’s Charge exhibit includes three displays relating the experience of the men as they marched toward the Union lines. Plaques explain the weapons bearing on them at various distances, and cases filled with shell fragments, bits of fuse, and bullet fragments immerse the viewer in an impression of the destructive power of concentrated infantry and artillery fire.

After three visits and perhaps six hours spent in the new museum, I am favorably impressed with both the quality and quantity of the exhibits. Definitely worth a visit, even if you have been to Gettysburg many times before. And it’s not only the new Visitors Center – the battlefield itself has changed dramatically in recent months. The NPS landscape restoration program has turned back the clock on the field of the second day’s battle around Little Round Top and Devil’s Den to 1863. I will be visiting again soon to explore the field and will post my impressions here, along with a few pictures.

Next Up: Antietam’s Final Attack Trail Part 2 (finally)!

Sunday, June 15, 2008

Antietam: The Final Attack Trail Part 1


On a recent visit to Antietam Battlefield I hiked the Final Attack Trail for the second time. The trail winds across the Otto Farm and the Forty Acre Cornfield, a tortured landscape of deep ravines and sharp elevations. Here, the advance of the Federal Ninth Corps unraveled under the pressure of a slashing flank attack by veterans of AP Hill’s Light Division in the final act of the bloodiest day in American history.

I set off with my backpack stuffed with books, maps, and a bottle of water. I carried along Carmen’s history of the campaign, Antietam: The Soldier’s Battle, and the War College guide. For hikes at Antietam, I always carry Trailhead Graphics’ battlefield contour map, and I also printed out two detailed views of the area extracted from the Carmen-Cope maps of the situation at 3:30pm and 4:20pm (these include unit positions). More on the Carmen-Cope maps in a later post. Many thanks to Antietam on the Web, where I first learned of this excellent resource. A narrative of the action as I understand it follows.

Harland’s Brigade of Rodman’s Division held the extreme left of the IX Corps line. The 11th Connecticut regiment of the brigade, recovering from its costly skirmish at the Rohrbach Bridge, remained behind. The 4th Rhode Island deployed on the left, the green 16th Connecticut in the center, and the 8th Connecticut on the right, linking up with Fairchild’s Brigade (see map above).

The two left regiments advanced into the ravine on the eastern end of the Forty Acre Cornfield and halted to await further orders, while the 8th Connecticut continued to advance along with Fairchild’s men. A gap opened in the center of the brigade just as Hill’s Division arrived on the scene. Gregg’s veteran South Carolina brigade seized the high ground at the southern and western edges of the cornfield (see picture map above).

One of Gregg’s regiments carried a flag that appeared to be the stars and stripes. Two officers and a color bearer from the 16th CT moved forward to investigate. Gregg’s men shot down the 16th CT’s color bearer within yards of their position and the two officers sprinted back to the regiment. Some of Gregg’s men may have been wearing coats or trousers from Federal uniforms captured at Harper’s Ferry, though whether this was apparent in the head high corn is debatable.

As Gregg’s men advanced, they unleashed a scathing volley. The Connecticut men had never loaded their rifles and had mastered only the rudiments of drill, a situation all too common in the Army of the Potomac in this campaign. Men fell, confusion reigned, orders were misunderstood. The 16th broke and ran to the rear, dragging the right wing of the 4th Rhode Island along with them in their haste to escape.

Ewing’s Brigade of the Kanawha Division was close behind in support of Rodman’s Division. As the demoralized men of the 16th CT and 4th RI streamed past, the security of the IX Corps flank, and the fate of its offensive, passed into their hands. More on that in my next post.

Thursday, June 12, 2008

Fire on the Mountain

This past Saturday, June 7, my wife and I headed to Fox's Gap on South Mountain for "Fire on the Mountain." Confederate artillery crews serving a battery of four Napoleon cannon demonstrated arillery drill and simulated counterbattery fire against a Federal battery deployed some 600 yards away. The rebels occupied the position held by Bondurant's battery during much of the fighting for Fox's Gap on September 14, 1862.

We started the day at Turners's Gap on Alt 40 near the South Mountain Inn (known as the Mountain House in battle reports). From there, the Applachian trail winds southward along the crest of South Mountain to Fox's Gap. The trail runs along the route of an old logging path known as the Wood Road, and was used by various rebel units moving to the defense of Fox's Gap.

The rebel battery demonstrated firing by piece and by section, followed by a tactical simulation of counterbattery fire and defense against infantry. The boom of the big brass guns echoed across the mountainside, hinting at the din of battle long ago in September, 1862. The heat was intense, the temperature approaching 100 degrees at mid-day. Many thanks to the reeanactors who carried out their drill commands with clarity and precision in an open field undert the hot sun while many spectators struggled to find a shady spot to watch the demontration. Thanks also to the property owner. Much of the battlefield is still in private hands, and without the generosity of these fine folks, events like "Fire on the Mountain" would not be possible.

Note: I added a slideshow above using Picasa by Google. Enjoy the photos!

Wednesday, June 4, 2008

A New Civil War Blog for Battlefield Enthusiasts

Civil War Battles and Battlefields will feature travel narratives of my frequent visits to historic sites and my thoughts on recent readings in Civil War history and historiography. I live in central Maryland, an ideal location for a Civil War buff. Gettysburg, Antietam, Harper’s Ferry, South Mountain, and Monocacy are all within an hour’s drive, and most of the Virginia battlefields are within easy day trip range.

I hope to convey some of my enthusiasm for these places, to give those who cannot visit these sites as often as I do a chance to experience the excitement of walking in the footsteps of the men who fought in these places over a century ago.

I will include photos and maps occasionally to enhance the sense of place in my travel pieces. In my opinion, the best site for photos of Civil War sites on the net is http://www.civilwaralbum.com. If you have not seen this site before, you are in for a real treat. So I won’t be posting virtual tours; rather, I hope to create specific impressions.

More often than not, my posts will focus on a narrow aspect of a particular battle. Generalists will find books and magazines more useful, perhaps. Occasionally, I may cover living history events, museums, preservation issues, or interesting Civil War sites on the net. I plan to post once per week during Spring and Summer, and semi-monthly during the colder months. Posts will average 500 words or less.

The first series of posts will narrate my recent explorations of Antietam Battlefield’s Final Attack Trail, where A.P. Hill’s Light Division pitched into the flank of Burnside’s IX Corps, snatching away the last, and possibly best, chance for a decisive Federal victory at Antietam.
Enjoy Civil War Battles and Battlefields. I welcome your comments, questions, and criticisms.