Thursday, August 28, 2008

The USS Monitor Center


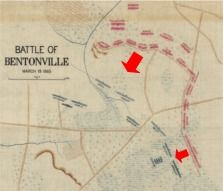
The duel between the USS Monitor and CSS Virginia is perhaps the most famous ship action in American history. To many, the fight sounded the death knell of wooden ships and ushered in the era of modern naval warfare. Whether you agree or not, a visit to the USS Monitor Center in Newport News, Virginia is a must for anyone with an interest in the battle of Hampton Roads and the strange new ironclads that fought to a stalemate there in 1862.

The USS Monitor Center is part of the Mariner’s Museum. While I visited mainly to see the center, the larger museum contains hundreds of interesting exhibits and model ships, including a notable gallery on the age of Nelson. Whether you intend to see the entire museum or not, consider a visit. The Monitor Center alone is worth the price of admission.

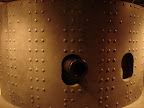
A full scale replica of the Monitor’s turret stands just beyond the Nelson gallery in the main museum. Near the turret is a Dahlgren replica mounted on a naval carriage. This is an impressive cannon, and I wonder how the battle might have been different had the Monitor’s crew used full instead of half charges for their guns.

Within the center itself are reconstructed officer’s cabins, videos of uniformed reenactors portraying various crew members, and a room containing the red distress lantern the Monitor’s crew hung above the turret shortly before she passed beneath the waves. One room contains a scene of the CSS Virginia in dry-dock. A replica of the bow of this massive vessel stands across the room, and as I moved through the exhibit, I entered by the port side and saw a reconstruction of the inside of the ship and peered through one of the gun ports on the bow.

The Battle Theater presents the story of the battle of Hampton Roads using stunning CGI graphics and surround sound in a three-sided theater – this is truly something to see and was one of the highlights of the visit. Another film details the efforts to raise the turret and preserve various artifacts from the ship, and the center includes a full-scale model of the turret as it was found on the bottom of the ocean, the guns upside-down and everything encrusted with sand and mud and debris. Beside this display is a cutaway model of the turret including one of the massive Dahlgrens mounted on it carriage.

Imagine walking on the deck of the Monitor as she was in 1862 and standing beside the massive gun turret. At the Monitor Center, you can (almost). Just outside the museum stands a full scale replica of the Monitor. I was truly impressed by the size of the ship. Plates on the deck detail various aspects of the ship and its crew.

Back inside the museum, the last gallery of the center focuses on the engines and the area beneath the massive turret. The cutaway replica of the turret stands immediately above. As conservation continues, this area may eventually contain the Monitor’s engines. On the way out, visitors can see the huge tanks containing the Monitor’s turret, engines and guns. Reversing the decay of ages will take several years at the least. Still, as I gazed down at the Dahlgren guns in their murky chemical bath, I was moved by the realization that I stood before one of the guns whose blasts marked the end of the age of sail and ushered in the age of iron.

I planned to spend two hours at the Mariner’s Museum and the USS Monitor Center. I spent five hours there, and it was well worth it. If your next Civil War tour takes you anywhere near Newport News, Virginia, plan to spend some time here.

Sunday, August 24, 2008

Book Review Roundup

As mini-reviews of books and Civil War web sites accumulate, I will consolidate them into permanent posts. The first three mini-book reviews follow.

Unfurl Those Colors (Marion V. Armstrong)

While I won't be doing formal book reviews, I will include opinions on recent reading. For thorough reviews, check out CWBN and CWBA, both listed in my favorite blogs list.

Unfurl Those Colors details the role of the Second Corps of the Army of the Potomac in the Antietam Campaign. Armstrong argues that Sumner's performance was not quite as bad as Sears and other historians contend.

Armstrong also argues that Sumner's decision to commit Sedgwick in the West Woods was reasonable given battlefield conditions, and that French's division did not drift toward the Bloody Lane, but was directed to attack to support the Federal right. His argument weakens a bit in his defense of Sumner's conduct after the destruction of Sedgwick's division.

Overall, Armstong delivers a detailed and entertaining analysis of the Second Corps' attacks upon the West Woods and Bloody Lane. Well worth reading, and sure to spark debate on these controversial actions.


The Ninth Corps at Antietam (John Schildt)

While this book provides interesting detail about the Ninth Corps in the Maryland campaign, I find it difficult to recommend due to a disjointed presentation, missing foot notes, and a lack of editing.

The main strength of the book is its diverse coverage of the Ninth Corps. Schildt includes brief histories of most of the regiments of the corps, material on hospitals after the battle, a narrative of Lincoln’s review of the corps during his visit to the battlefield, and extracts from regimental monument dedications.

If you are particularly interested in Ninth Corps minutiae, consider this book.

Roll Call to Destiny (Brent Nosworthy)

Brent Nosworthy’s new book compiles detailed accounts of several Civil War actions originally intended for his previous. Each examines a representative tactical situation, such as infantry in rough terrain, infantry assaulting fortifications, cavalry vs. cavalry, and artillery in attack and defense.

Aside from its generally entertaining vignettes, the book stands out for detailed tactical observations not always found in other works. What the book lacks in unity and synthesis is corrected when taken together with Nosworthy’s previous book. And as the accounts of each action stand alone, this is a great read for time-challenged Civil War enthusiasts.

Highly recommended, along with Bloody Crucible of Courage (get this book if you don’t have it).

Tuesday, August 19, 2008

Averasboro Battlefield


I finished my tour of Bentonville with several hours of daylight remaining and struck out for Averasboro. The latter is about one hour’s drive over rural roads from Bentonville, and is well worth a visit. Though I did not arrive in time to see the visitors center, I saw enough of the field to make the detour worthwhile, and will definitely visit again in the future when opportunity offers.

The battle of Aversaboro was fought prior to the climax of the campaign at Bentonville. Hardee’s delaying action on March 16, 1865, assisted by a steadily worsening rain falling throughout the day, separated Sherman’s wings under Slocum and Howard, giving Johnston a chance to defeat them in detail.

As the visitors center was closed, I missed the map room display and also a diorama of the Federal assault on Hardee’s first defensive line, manned by the troops of Rhett’s brigade. The generally flat, open terrain of the battlefield seems at first glance to offer few opportunities for defense. To compensate for this, Hardee deployed in three lines. To the rear of Rhett’s troops in the first line, Hardee posted Elliot’s Brigade of Taliaferro’s Division behind field works. McLaws Division anchored the third and final defensive line, straddling the Raleigh Plank Road (modern Rt. 82) near the present location of Chicora Cemetery.

With sunset fast approaching as I pulled in to the visitors center parking lot, I toured the battlefield in reverse chronological order. The visitors center appears to be located near the site of a ravine defining the northwestern flank of the last rebel defensive line, an area marked by heavy fighting between Vandever’s Federal brigade and Wheeler’s cavalry. Chicora Cemetery, roughly the center of Hardee’s third line, is a short distance to the south along Route 82. The cemetery contains several Confederate graves and also a reconstructed slave cabin from one of the local plantations present at the time of the battle.

Continuing further south along Route 82, I passed the second confederate defensive line, then pulled off to the right on a small side road marking the position of the first rebel line, manned by the Rhett’s troops. Here, Case’s Federal brigade moved north along a tree-lined ravine to the west of Rhett’s position and stormed out of the woods, rolled up the rebel flank and overran two artillery pieces. A small hillock to the south marks the position of the Federal artillery, and is the only elevation of note in the battlefield.

One of the notable aspects of Averasboro, and of the Bentonville battlefield as well, is the detail of the roadside historical markers. Unlike many historical markers that provide and incomplete picture at best, these provide interesting and relevant detail. Both of these battlefields are success stories of preservation efforts by state and private organizations. And both are well worth a visit.

(Photos to accompany the Bentonville and Averasboro posts coming soon.)

Note: Map from the David Rumsey Collection, courtesy of Cartography Associates (see www.davidrumsey.com for numerous maps of Sherman’s campaigns).

Sunday, August 10, 2008

Bentonville Battlefield


The battle of Bentonville, perhaps the Confederacy’s last hope to stave off final defeat, witnessed the last charge of the Army of Tennessee and was the climactic contest of Sherman’s campaign to subdue the Carolinas. The battlefield is marked by alternating areas of open fields, stands of tall oaks or scrub pine, and swampland. The only elevation changes of note are two depressions. The first of these, formed by a Y-shaped ravine on the western part of the field, figured prominently in the early stages of the fight. The second, formed by the course of Sam Howell Branch, marked part of Johnston’s defensive line on the second and third day of battle.

The action at Averasboro on March 16, 1865, separated the wings of Sherman’s army under Slocum and Howard as Johnston gathered a scratch force combining elements of the Army of Tennessee with forces of the department of North Carolina under Bragg, and of South Carolina, Georgia, and Florida under Hardee. The Federal Fourteenth Corps, under Jefferson C. Davis, led Slocum’s advance toward Bentonville along the Goldsboro Road (SR1008).

Bentonville Battlefield is a North Carolina State Historic Site featuring a four stop driving tour. The visitor’s center offers a fiber optic map detailing the events of the first day’s battle, a short introductory film, and a small book store. Contact them for Moore’s Historical Guide to the Battle of Bentonville and Bradley’s Last Stand in the Carolinas. Both of these excellent works are generally unavailable elsewhere. The maps on the battlefield’s web site (http://www.nchistoricsites.org/bentonvi/) are drawn from Moore’s work, one of the finest battlefield guides I have seen. It includes detailed maps for every phase of the action and references to help you orient your view from the various roadside markers on the battlefield, as well as maps for the preceding engagements at Averasboro and Monroe’s Crossroads.

The driving tour at Bentonville contains four stops. Three focus on the action of March 19, while the fourth is near the site of Union General Joseph Mower’s breakthrough on March 21, near the site of Johnston’s headquarters. Numerous historical markers also line the roads that traverse the battlefield. Moore keys all of the maps in his guide (and on the battlefield web site) to the location of these markers, so it is possible to orient the maps from each of them to enhance your understanding of the action. I focused on the main tour stops on this visit.

The first stop, “Confederate High Tide,” is just to the north of the Federal line on March 19, where Stewart’s Army of Tennessee drove hard against the Federal center (photo 1). The broad expanse of open farmland framed by woods to the east and west here offered an excellent field of fire for a concentration of Union guns to the south. These cannon shored up the Federal line and unleashed a storm of fire on the charging rebels, buying time for brigades of the Fourteenth and Twentieth Corps to form an effective defense.

While the Army of Tennessee attacked in the center, Hoke’s Division of Bragg’s Department of North Carolina command attacked the Union right defended by Morgan’s Division of the Fourteenth Corps. Stop 2, “Morgan’s Stand,” offers views of the swampy woodland defended by Morgan’s troops (photo 2). Several brigades veered eastward from the Confederate center, increasing the pressure on Morgan and bending his left back perpendicular to his main line. Just as his men repulsed Hoke’s attacks from the west, the rebels appeared in his rear. Morgan’s men, with the pluck of seasoned veterans, simply hopped over their works, fought them in reverse, and repulsed these attacks as well.

Stop 3 of the tour straddles the position of the 100 young soldiers of the North Carolina Junior Reserves, the largest brigade in Johnston’s army. The Reserves were only lightly engaged during the fighting at Bentonville, but their position marks the pivot point between the two Confederate wings in their attacks on March 19. Later, when Howard’s wing of Sherman’s army approached from the east, the Reserves pulled back to the north, forming the southern apex of Johnston’s horseshoe shaped defensive line on March 20-21. The view to the east from this position (photo 3) takes in Cole’s Plantation, where Stewart’s Army of Tennessee attacked and routed Carlin’s Division of the Fourteenth Corps in the opening phases of the battle. The ravine marking Carlin’s position conforms roughly to the tree line visible in the distance to the right.

As the fighting drew to a close on March 19, the hard pressed soldiers of the Federal Fourteenth and Twentieth Corps worked to improve their positions for the expected renewal of the rebel assaults the following day. Johnston, however, taking stock of his losses and the approach of Howard’s wing of Sherman’s army, decided to pull the Army of Tennessee back to his start line. He also ordered Hoke’s Division to disengage and take up a new position fronting eastward across the wooded ravine marking the course of Sam Howell Branch and then bending back to the northwest along the Bentonville Road. McLaws Division deployed to the left of Hoke, and Wade Hampton’s cavalry troopers covered the extreme flank to the north.

March 20 saw no action as Howard’s men moved onto the field and linked up with Slocum’s battered wing. March 21 dawned overcast and rainy, and the armies faced one another over the ramparts of hasty fortifications. Toward late afternoon, Union General Joseph Mower advanced his division without orders and punched a hole in Johnston’s left. Mower’s men surged across large areas of swampy ground and quickly overwhelmed the rebel defenders, nearly overrunning Johnston’s headquarters (photo 4). Johnston and his staff, surprised at this turn of events, fled the area on foot as Generals Hardee and Hampton scraped together available infantry and cavalry for a counterattack. With no support at hand, Mower’s troops grudgingly gave ground and retreated back to their original positions. Howard pressed Sherman for authorization for a general attack, but Sherman demurred.

Johnston’s army withdrew from the field on the night of March 21. This last desperate attempt to stop Sherman’s advance cost his armies 1,527 casualties. Sherman’s forces suffered 2,606 casualties. In less than two weeks, Grant’s armies broke through at Petersburg and began the final pursuit of Lee’s Army of Northern Virginia. Johnston withdrew westward toward Durham, North Carolina. He surrendered his army and all Confederate forces east of the Mississippi on April 26, 1865 at Bennett Place, near Durham.